Last updated - July 10, 2025
- Navigate to the "Manage Sections" page on your manager portal.
.png?width=688&height=430&name=screenshot-rocks%20(25).png)
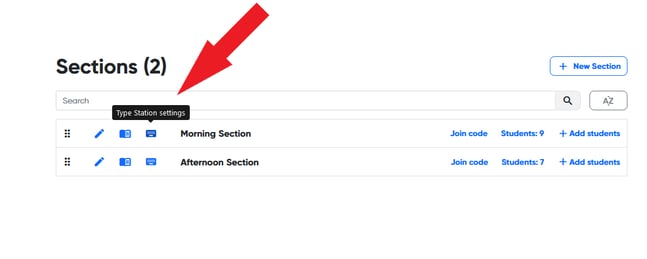
- Click the blue "Type Station settings" button to the left of a section name.
- In the pop-up menu, click "View/create custom typing assignments."
.png?width=688&height=430&name=screenshot-rocks%20(39).png)
- Click the blue "+ New typing assignment" button to create a new assignment.
.png?width=688&height=430&name=screenshot-rocks%20(40).png)
- In the menu that pops up, you can customize a number of settings:
.png?width=688&height=430&name=screenshot-rocks%20(41).png)
- title
- details
- typing mode:
- paragraph (multi-line)
- sentence (one-line)
- single letter (one-letter at a time)
- section (which section you would like this assigned to)
- assignment content
- timer in seconds
- Click "Save" and your assignment is live! To preview how the assignment looks for students, click the "open in Type Station" button on the right-hand side of the assignment.
.png?width=688&height=430&name=screenshot-rocks%20(42).png)
Students can view custom assignments by clicking the "Custom Assignments" button in the top left corner of the Type Station homepage.