
Welcome to Skill Struck’s Free for Classroom account! Please reference this how-to guide below to learn how to use your free account..
Last updated - July 25, 2024
Here is a video tutorial on how to use your Free for Classroom account.
Educator Portal
This is Skill Struck’s free Educator Portal. This is where you can access all the tools you need to be able to use the platform effectively.

01 Manage Sections
The first thing you want to do when you start using your free account is select Manage Sections. This is where you set up your account to be able to add your students to the platform.

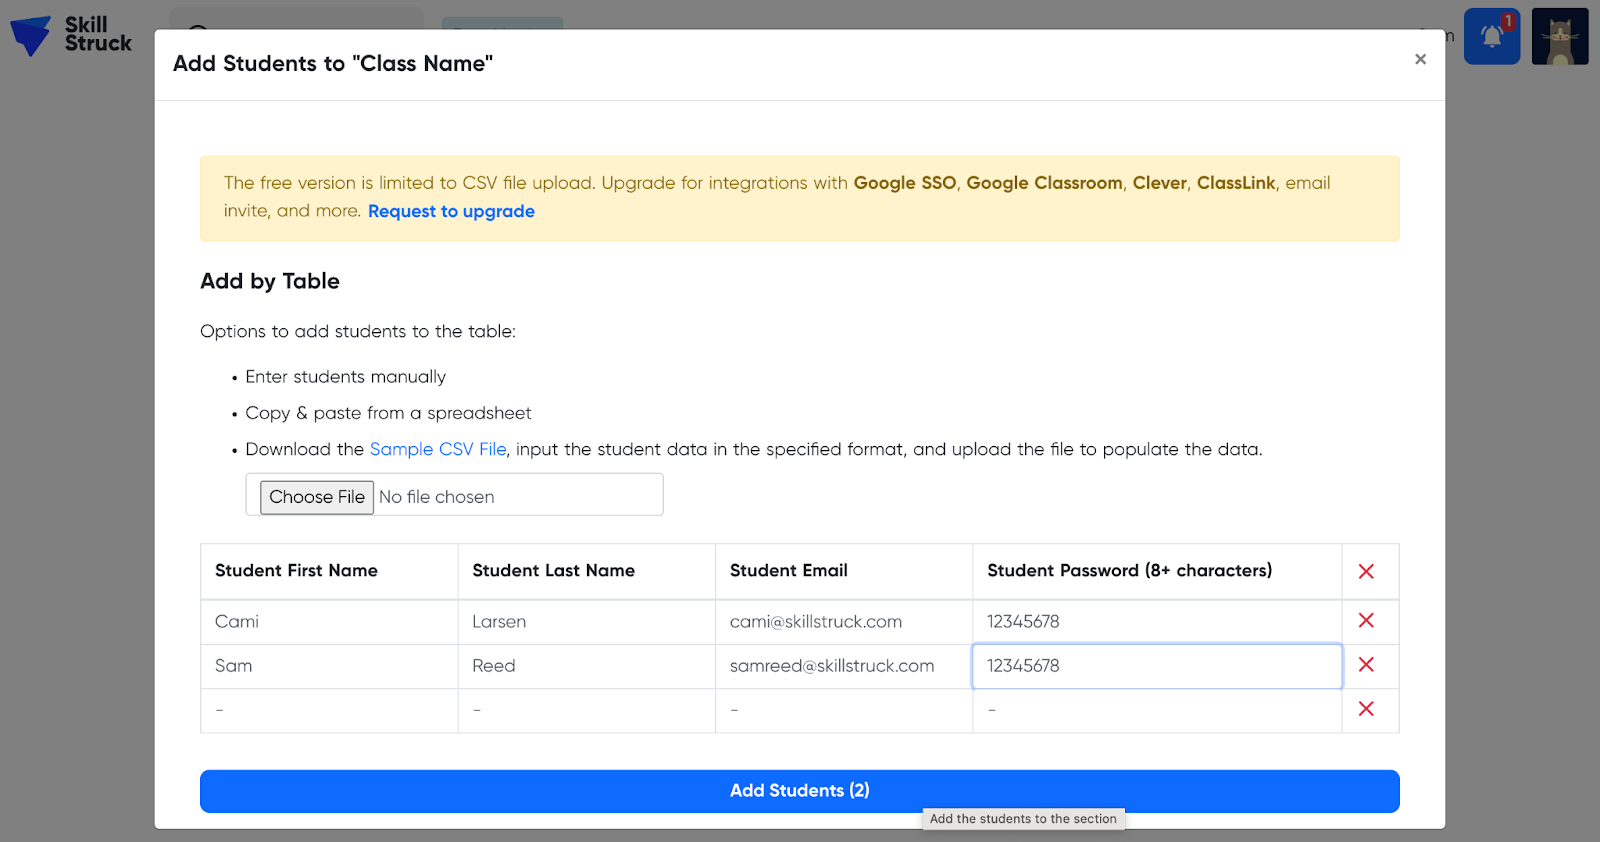
To create a new section, select “+ New Section” at the top right corner.

Add your “Section name,” which platform this section will be using based on their grade level, and what grade level will be in this section.
If you only teach one grade, you can apply this setting to all your sections.
Now that you have your section, you can now add your students. Select “+ Add Students.”


There are a few ways you can add your students. The easiest way will be to use the table. Add your student’s first name, last name, student email, and password. This password needs to be 8 characters or more.
After you have added in your students, you will need to share with them the email and password they need to access their accounts. Students will have the opportunity to make their password unique later so keep it simple.
Students can log into their new and free accounts at www.skillstruck.com.

02 Manage Students
When you click into “Manage Students” you can access all the students that you have added to your account by section or as a whole. You can edit your students in this tool.

You can do things like change name, username, email, which section your student is in, and their password. You can also remove their account if needed.
You can also create “ + Create New Student” from this view if you have already created your sections.

03 Student Progress
Once your students are in and using this Free for Classroom account, you will have the ability to see their progress. You can access the “Student Progress” option on your Educator Portal.

In the student progress feature, you can take a look and see how your students are progressing through the course. This can be helpful to see which students are excelling and which might need a little extra help.

04 Lesson Plans
On your Educator Portal underneath “Resources” you have a free “Lesson Plans” option.

When you click into “Lesson Plans” you will see at the top free lesson plans. All these options here are lesson plans you can utilize in your classroom.

When you open the lesson plans you will see helpful resources to be able to teach the lesson plan. You can also see standards that the lesson aligns to. As you scroll, you can see the outline of the lesson. You can either use this as they are or make it your own.

Launch Pad (K-5)
Launch Pad is what your K-5 students see when they login. You can access what your students see by going to platforms and selecting “Launch Pad.”

01 Student Profile
On the top right corner you will see the student profile.

This is where your students can change their password, change their code settings from block to text, change their language from English to Spanish, and turn on their accessibility features.

02 Lessons + Activities
Skill Struck’s Free for Classroom accounts includes free lessons and activities for 1, 2, 3, 4, and 5th grades. Select “All Lessons” and “Change Grade” to get to the grade you’d like to explore.

Here you can see there are lessons dedicated to the Free for Classroom accounts.

When you click into each of the grade levels you can see the different lessons that are available in the free plan.
Each lesson includes reading, quizzes, puzzles, and games. All these options are to help solidify the topics.


03 Puzzles
Skill Struck has built “Puzzles” to help students engage in coding principles. You can access these within lessons when you see “Puzzles.”

Students can change the theme of the puzzles.

And drag and drop blocks to make their sprite character move.

Students can also swap to text-based code when they are ready.

Voyage (6-12)
You can access what your 6-12 students see by going to platforms and selecting “Voyage.”

01 Settings
After your student has logged into Skill Struck using the email and password you shared with them, they can come into “Settings.”

In “Settings” they can make a unique password, change their curriculum between Spanish and English, and turn on their accessibility features.

02 Profile
Students can access their “Profile” here.

In “Profile” they can check how many points they have earned after completing checkpoints on the platform. As your students start using Skill Struck you will see these numbers increase.

03 Projects
Students are able to view projects they have created in Skill Struck in “Projects.”

On this free account they are only able to save one of their projects. Once they have opened their projects they can rename their project, delete it, download it, preview it, export to GitHub, or set it live.

04 Code
Students can access a textbook, challenges, a code editor, and more in “Code.”

On this view, students can access all the different course options that the Skill Struck free version has.

Your students can work their way through these on their own or with your help. You'll see as you open these up there are helpful videos and checkpoints as they go along the course.

In the middle there is the code editor. Before they can begin to code they first have to create a file. They can do that by selecting a new file here and giving it a name.

After they have created their file students can begin coding. You’ll see on the right hand side that whatever you code will display.
Log In Access
In order for you and your students to access Skill Struck at any time you can visit www.skillstruck.com.
You will need to remember your username and then follow up with the password.
Remember to add your section and students. The information you place in there will be what you need to give your students to log in.