Last updated - December 17, 2025
Using the micro:bit USB cable, you can connect the micro:bit directly to the platform and follow the on-screen instructions, or you can download a file and transfer it to the micro:bit manually.
If you are using an Apple Mac device, many newer models (from 2015 onward) do not have a Type-A USB port. You will need either a special adapter (such as a USB hub) to link the USB-A connector to your device or a cable with a Type-C connector.
Connecting Your Micro:bit
- Click the three dots ... to the right of the download button at the bottom of the screen.
- Click "Connect device."
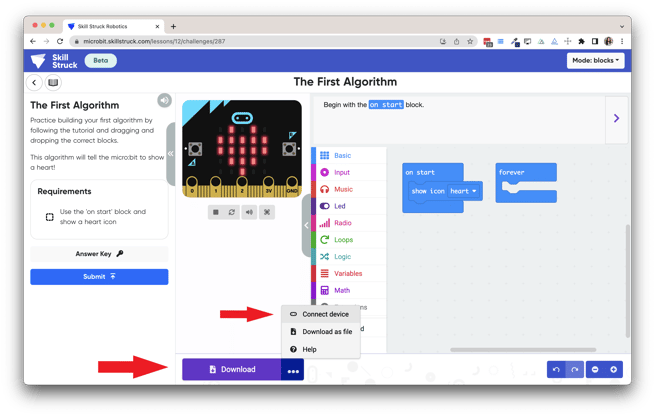
- Connect your micro:bit cable to both your micro:bit and your computer.
.png?width=670&height=427&name=image%20(3).png)
- Read the instructions and click "Next" to continue.
.png?width=655&height=417&name=image%20(4).png)
- In the second box that pops up, the micro:bit will either be named "BBC micro:bit CMSIS-DAP" or "DAPLink CMSIS_DAP." Select the micro:bit name and click "Connect."
.png?width=670&height=427&name=image%20(5).png)
- Now your micro:bit is connected! To download code to the micro:bit, click the "Download" button at the bottom of your screen.

- A light will flash on the micro:bit when the program starts transferring from your computer.
- Once the light stops flashing, the file is finished transferring and the program can be run on the micro:bit!
Manual Approach
- To manually transfer your code to the micro:bit, click the "Download" button at the bottom of your screen. This will download the code as a .hex file.
- Plug one end of the USB cable into the micro:bit and the other end into your computer.
- Look for a folder that says "MICROBIT."
.png?width=670&height=560&name=image%20(10).png)
- Drag the .hex file from your downloads folder to the micro:bit folder.
.png?width=670&height=272&name=image%20(12).png)
- A light will flash on the micro:bit when the program starts transferring from your computer.
- Once the light stops flashing, the file is finished transferring and the program can be run on the micro:bit!
For a video tutorial, click here.